Short answer: Make a backup then setup a local synchronisation between your iPhone and your Mac
WARNING
I'd like to preface my answer by saying that the following procedure is viable for people who only have a Mac and an iPhone.
If you have more than one Mac or if you have other brands in the mix (Android phone and/or Windows computer), then the best is to stick with synchronising your contacts through the cloud provider of your choice.
Doing so will make your life much easier without compromising too much your privacy.
With that said, here's my answer to the above question.
To avoid losing data, I recommend the following process:
Connect your iPhone to your Mac
Backup all your contacts on your Mac
Stop synchronizing your contacts with the cloud
Synchronise your contacts between your Mac and your iPhone
(Optional) Delete all the contacts you have in the cloud
Step 1: Connect your iPhone to your Mac
The idea here is to connect your iPhone to your Mac via a USB cable to make sure that they can communicate properly.
If it's the first time, you'll need to authorize both devices to exchange data with each other:
On your Mac, open the Finder
Click on your iPhone's name in the sidebar
Click on the blue "Trust" button

4. On your iPhone, tap on "Trust"

5. Enter your iPhone's passcode
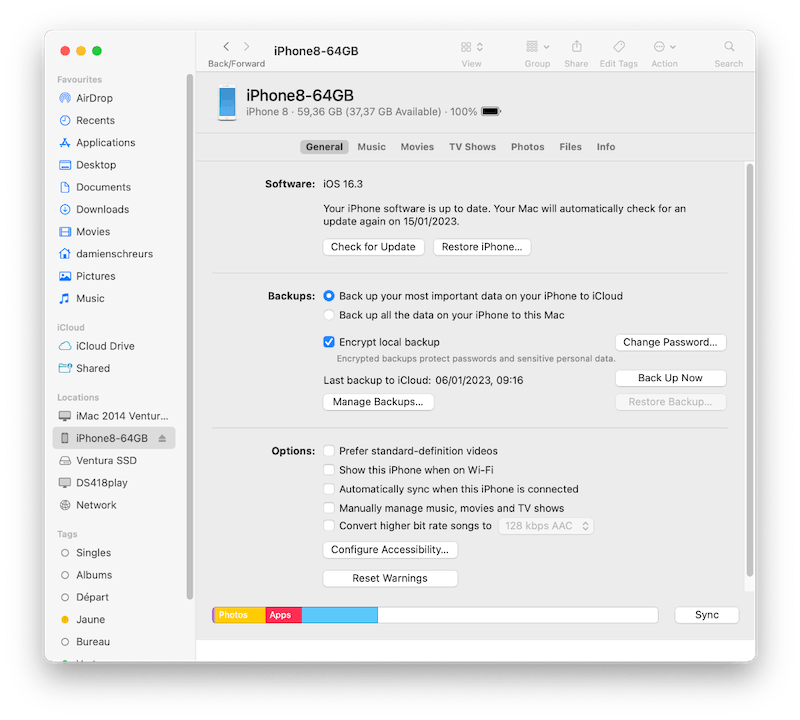
Now you should see information about your iPhone in a Finder window
⚠️ You should not proceed further if you can't see the above screen.
There can be several reasons for this:
The USB cable is broken or malfunctioning
Fix: Try or buy a new cable
The USB port on your Mac is malfunctioning
Fix: Try another USB port or visit an authorized Apple Repair Center
The lighting port on your iPhone is malfunctioning
Fix: With a toothpick, gently scrub any residue potentially stuck in the lightning port. If it doesn't help, visit an authorized Apple Repair Center
Your Mac is running an older version of macOS incompatible with the version of iOS on your iPhone
Fix: Upgrade your Mac at least to macOS 11 Big Sur or use/purchase a newer Mac
⚠️ Only proceed with step 2 once you've found a solution.
Step 2: Backup all your contacts on your Mac
Make sure to synchronise your contacts on your Mac.
If not done yet, visit System Preferences > Internet Accounts (macOS Monterey or earlier) or System Settings > Internet Accounts (macOS Ventura and later) then add all the necessary accounts and make sure that "Contacts" syncing is activated.
Then, follow these steps to create a local backup of your contacts on your Mac:
Open the "Contacts" app
Click on the group called "All iCloud"
Click on the 'File' menu then 'Export' and choose 'Export vCard ...'
Choose a convenient destination (Desktop or Documents folder)
Use today's date and the cloud service name to name the .vcf file
For example '2022-12-21 All iCloud.vcf'
Click on the 'Save' button
If you had created subgroups, do the same for each of them
Repeat steps 2 through 7 for the other cloud accounts (Google, Hotmail, ...)
Once done, follow these steps to create a local copy of all the contacts from each Cloud service:
Click on the group called "All iCloud"
Click on the first contact you see in that list
Click on the 'Edit' menu then on 'Select All'
Click on the 'Edit' menu then on 'Copy'
Click on the group called "All on My Mac"
Click on the 'Edit' menu then on 'Paste'
Repeat steps 1 through 6 for the other cloud accounts (Google, Hotmail, ...)
After this step, you should have a copy of all your contacts in the group called "All on My Mac"
Perform a Time Machine backup of your Mac so that you even have a second copy of all your contacts just in case.
Step 3: Stop synchronizing your contacts with the cloud
On your Mac:
Open the Contacts app
Click on the 'Contacts' menu then on 'Preferences'
Click on the 'Accounts' tab
For each cloud account, uncheck the box that says 'Enable this account'
At the end of this process, you should only see the "On My Mac" section in the sidebar and all your contacts in the group entitled 'All on My Mac'
On your iPhone:
Open the 'Settings' app
Scroll down then tap on 'Contacts'
Tap on 'Accounts'
Tap on 'iCloud' then 'iCloud' again then 'Show all' then turn off Contacts syncing
Tap on 'Delete from my iPhone'
Tap three times in the top left corner of the screen
'iCloud' then 'Apple ID' then 'Account'
Tap on the next cloud account (i.e. Google)
Turn off contacts syncing
Tap on 'Delete from my iPhone'
Tap on 'Accounts' in the top left corner
Repeat steps 7 through 10 for all other cloud accounts
At the end of this process, you shouldn't have any contacts left on your iPhone.
Step 4: Synchronise your contacts between your Mac and your iPhone
Now we just need to configure your Mac to synchronise its contacts with your iPhone.
Here's the procedure:
Connect your iPhone to your Mac via a USB to Lightning cable
Unlock your iPhone
If needed, authorize the connection
On your iPhone, tap on 'Trust this computer'
On your Mac, enter your user account password
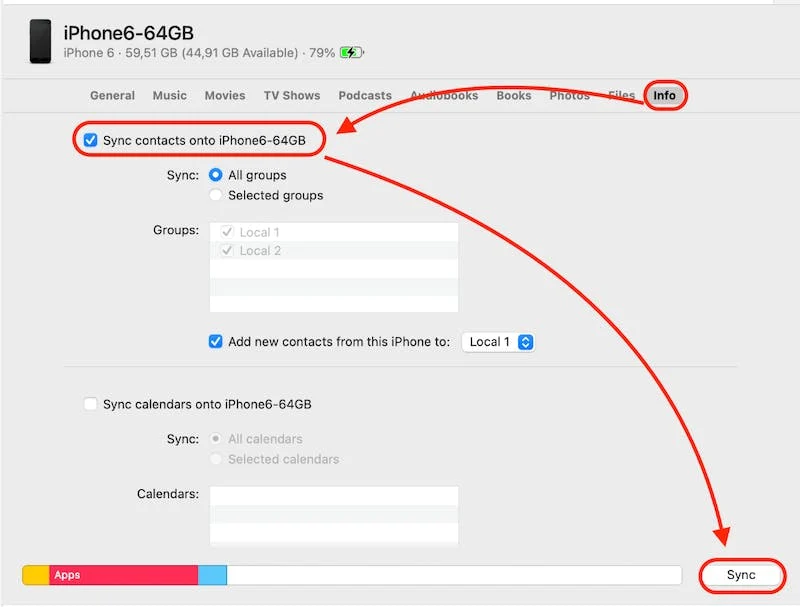
Open Finder and in the sidebar, under 'Locations' you should see the name of your iPhone
Click on your iPhone's name
Click on the 'Info' tab
Tick the box that says 'Sync contacts with <name_of_your_iphone>
Make sure that 'All Groups' is ticked
Click on the 'Sync' button (bottom right)
Wait until the first sync job finishes
On your iPhone, open the 'Contacts' app and check that all your contacts are there
To activate the synchronisation of your contacts wirelessly, do the following:
Under your iPhone's name, click on the 'General' tab
Tick the box that says 'Show this iPhone when on 'Wi-Fi'
Tick the box that says 'Automatically sync when this iPhone is connected
Click on the 'Apply' button
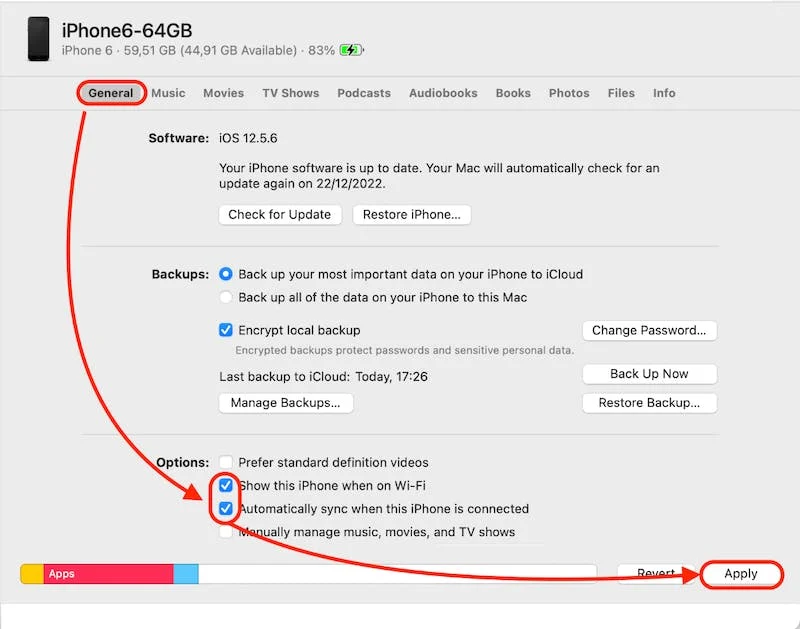
Now, even if you unplug your iPhone from your Mac, the name of your iPhone will remain in the Finder sidebar as long as both devices are connected to the same Wi-Fi network.
If you make changes to your contacts on your Mac or on your iPhone, you'll need to synchronise them manually.
The synchronisation is bi-directional, meaning that any change you make on either device will be reflected on the other.
To do that:
either plug your iPhone into your Mac and wait for the automatic sync to finish
or open 'Finder', click on your iPhone's name then on 'General' and finally on the 'sync' button
Step 5: (Optional) Delete all your contacts still in the cloud
At this point, you may decide to completely remove the contacts you had stored in the cloud.
⚠️ Please note that if you do that, each time you'll want to send a new email from a cloud account inside a browser session, you'll need to manually type the email address of the recipient since your cloud contacts list will be empty.
Replying to an email from a browser session will work without issue though
If you really want to do that, the best is to log into your cloud account from a browser then visit the 'Contacts' section, select them all then manually delete them.
For iCloud, you'd visit https://www.icloud.com/contacts
For Google, it would be https://contacts.google.com
For Hotmail, it would be https://outlook.live.com/people/0/
Conclusion
As you've just seen, it's possible to manage and synchronise contacts between an iPhone and a Mac without the need to rely upon the cloud but it requires some heavy lifting to do so.
From a privacy protection standpoint, it's obviously the best solution, but it comes with some inconveniences:
You need to remember to sync your contacts between your iPhone and your Mac
If you introduce another mobile device, you'll need to manually sync that one too
You can't sync contacts between your iPhone and two Macs simultaneously
Your contacts will only be available from within Apple's built-in Mail app (if you decide to delete all your contacts from the cloud)
The last point makes sense if your email address is tied to your Internet service provider (i.e. Post.lu, Orange, AT&T, Verizon, ...) rather than to a major cloud e-mail provider like iCloud, Gmail or Hotmail.
If the latter is true, then writing emails from a browser will quickly become very challenging and you'll soon want to get your contacts back in the cloud.
Want to receive this kind of FAQ automatically via e-mail alongside Apple news?
Just click on the thumbnail below to join the club